

转载声明:文章来源:https://blog.csdn.net/Have_MonkeyG/article/details/125919580
一、什么是Springboot?(Springboot的概念)
Spring Boot 是由 Pivotal 团队提供的全新框架。Spring Boot 是所有基于 Spring Framework 5.0 开发的项目的起点。Spring Boot 的设计是为了让你尽可能快的跑起来 Spring 应用程序并且尽可能减少你的配置文件。
Springboot可以帮你简化spring的搭建,并且快速创建一个spring的应用程序。该框架使用了特定的方式来进行配置,从而使开发人员不再需要定义样板化的配置
二、Springboot的特点
(1)可以创建独立的Spring应用程序,并且基于其Maven或Gradle插件,可以创建可执行的JARs和WARs;
(2)内嵌Tomcat或Jetty等Servlet容器;
(3)提供自动配置的“starter”项目对象模型(POMS)以简化Maven配置;
(4)尽可能自动配置Spring容器;
(5)提供准备好的特性,如指标、健康检查和外部化配置;
(6)开箱即用绝对没有代码生成,不需要XML配置。
三、创建Springboot工程
1.前提准备
1.JDK必须为1.8以上
2.spring的jar必须5.0以上
3.maven必须3.3以上
2.创建Springboot的方式(两种)
(1)使用idea快速创建(必须联网)
a.
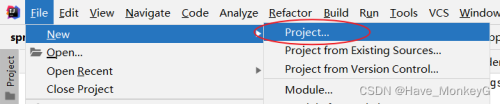
b.使用idea创建springboot项目也是连接它的官网
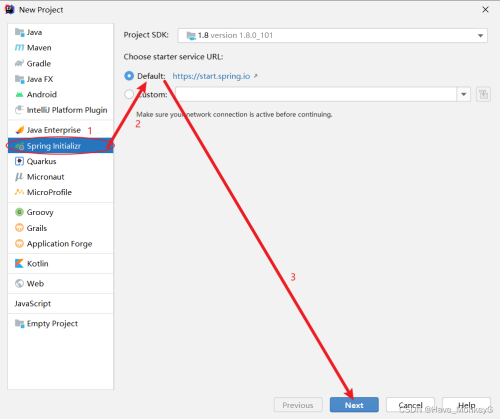
c.
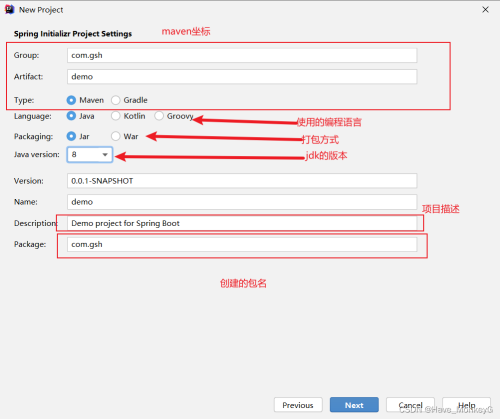
d.

e.

(2)基于maven的形式创建
1. 引入父工程
2. 加入web依赖
四、介绍pom文件
选取两个重点jar依赖包来说
1.
<!--parent: 继承
           如果你的maven项目想成为springboot工程必须继承SpringBoot父依赖
    -->
    <parent>
        <groupId>org.springframework.boot</groupId>
        <artifactId>spring-boot-starter-parent</artifactId>
        <version>2.3.12.RELEASE</version>
        <relativePath/> <!-- lookup parent from repository -->
    </parent>
2.
<!--web的启动依赖 把spring中常见的jar都集成到该依赖中,集成了springmvc的启动配置类 -->
        <dependency>
            <groupId>org.springframework.boot</groupId>
            <artifactId>spring-boot-starter-web</artifactId>
        </dependency>
五、Springboot的两种配置文件
为了方便演示我们先在主包下创建一个Person实体类
一定要有get,set方法
@Data
public class Person {
    private String name;
    private int age;
    private String hobby;
    private Map<String,Object> map;
}
1.Properties属性文件
语法:
属性配置:以“键=值”的方式书写一个属性的配置信息。
properties文件的一个属性配置信息值可以换行,但键不可以换行。值换行用“\”表示。
properties的属性配置键值前后的空格在解析时候会被忽略。
properties文件可以只有键而没有值。也可以仅有键和等号而没有值,但无论如何一个属性配置不能没有键。
例子:
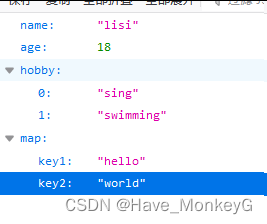
#为实体类属性赋值
person.name=lisi
person.age=18
#为数组赋值
person.hobby[0]=sing
person.hobby[1]=swimming
#为map赋值
#第一种
person.map.key1=hello
#第二种
person.map[key2]=world
2.yml文件
1、yml文件以缩进代表层级关系
2、缩进不允许使用tab只能使用空格
3、空格的个数不重要,只要相同层级的元素左对齐即可
4、大小写敏感
5、数据格式为,名称:(空格)值
#为对象的属性赋值
Person:
  name: zs
  age: 18
#  为数组赋值
  hobby:
    - dance
    - swim
#   为map赋值
  map:
    clazz: qy151
    stuno: 35
3.两者的共性与不同
不管是哪种,他们的名字必须以application开始。
如果两个配置文件同时存在,而且有些内容一样。按照properties的优先级高。如果有些不一样,两个配置文件不一样的会合并在一起。
Properties 没有层级关系 使用=赋值
Yml 有层级关系 使用: 赋值
六、读取springboot配置文件中的内容
通过@PropertiesConfiguration或者@Value注解。
1.通过@PropertiesConfiguration注解获取
@PropertiesConfiguration该注解使用在类上。
@Data
//该类对象的创建和销毁都有spring容器来管理
@Component
//读取springboot配置文件中的内容
@ConfigurationProperties(prefix = "person")

public class Person {
    private String name;
    private int age;
    private String[] hobby;
    private Map<String,Object> map;
}
@RestController
public class HelloController {
@Autowired//spring会自动帮你注入对象
private Person person;
@RequestMapping("person")
public Person peo(){
return person;
}
}
2.通过@Value 注解获取值
注:@Value 只能放在我们的类属性上。而且它只能读取基本类型和字符串类型。
@RestController
public class HelloController {
    @Value("${person.name}")
    private String stuName;
    @Autowired//spring会自动帮你注入对象
    private Person person;

    @RequestMapping("/person")
    public Person peo(){
        //这是通过value获取的a
        System.out.println("这是通过Value注解获取的值:"+stuName);
        return person;
    }
}
3.*情况说明*
1,如果配置是写在properties里面
只有Map不能取到
2,如果配置写在yml 数组 集合 都取不到
3,如果属性是使用驼峰命名法则不能使用属性名注入,要使用@Value("${student.user-name}")来取值
不能使用@Value("${student.userName}")来取值
七、profiles文件的介绍(详解)
1.为什么要使用profiles?
我们在实际开发中,环境有哪些?
开发环境---->测试环境---->线上环境 由于环境的不同,那么就会有不同的配置内容。
难道我们不断的修改配置内容。----不会
实际工作中,针对不同的环境配置不同的配置文件,然后在总的配置文件中激活相应的配置文件。
有时候开发环境和生产环境的配置方法是不一样的,那么如何快速的切换呢,这里就要使用profiles文件
2.使用方法:profiles的创建
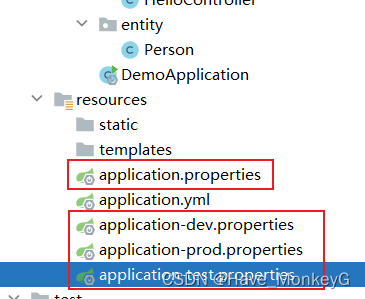
application-dev.properties
server.port=8081


application-test.properties
server.port=8083


application-prod.properties
server.port=8084


application.properties
#激活哪一个文件就会使用哪一个端口
spring.profiles.active=dev
八、Springboot注册web三大组件
什么是web的三个组件?
Servlet和Filter以及Linstener监听器。
为什么要注册这三个组件呢?
因为后面springboot有可能要集成第三方框架,而第三方框架的底层可能就依赖于过滤器或者servlet.
在Springboot中如何注册这三个组件?
我们选取两个(Servlet,Filter)来进行注册
1.Servlet在springboot中的注册
首先我们创建一个自己的Servlet类
public class MyServlet extends HttpServlet {
    @Override
    protected void service(HttpServletRequest req, HttpServletResponse resp) throws ServletException, IOException {
        System.out.println("这是我们自己定义的Servlet");
    }
}
创建一个自己的配置类
//添加配置注解,表示该类为配置类
    @Configuration
public class MyConfig {
        @Bean//配置文件中的bean
    //Servlet
    public ServletRegistrationBean<Servlet> registrationBean(){
            //创建一个Servlet注册器
            ServletRegistrationBean<Servlet> registrationBean=new ServletRegistrationBean<>();
            //获取名字
            registrationBean.setName("my");
            //获取我们自己定义的Servlet
            registrationBean.setServlet(new MyServlet());
            //url映射
            registrationBean.addUrlMappings("/my");
            return  registrationBean;
        }

}
2.Filter在springboot中的注册
首先我们创建一个自己的Filter类
public class Myfilter implements Filter {
    @Override
    public void doFilter(ServletRequest servletRequest, ServletResponse servletResponse, FilterChain filterChain) throws IOException, ServletException {
        System.out.println("经过了我的过滤器");
        //放行
        filterChain.doFilter(servletRequest,servletResponse);
    }
}
在配置内中添加filter的bean
@Bean
    //Filter
    public FilterRegistrationBean<Filter> filterRegistrationBean(){
            //创建一个filter注册器
            FilterRegistrationBean<Filter> filterFilterRegistrationBean=new FilterRegistrationBean<>();
            //获取名字
            filterFilterRegistrationBean.setName("myfilter");
            //获取我们自己的定义的filter
            filterFilterRegistrationBean.setFilter(new Myfilter());
            //添加过滤网址
            filterFilterRegistrationBean.addUrlPatterns("/*");
            return filterFilterRegistrationBean;
        }


帖子还没人回复快来抢沙发