文章申明:转载来源:https://blog.csdn.net/a549654065/article/details/88576948
1.1基本语法
1.1.1 官网
1) 英文官网: https://vuejs.org/2) 中文官网: https://cn.vuejs.org/
1.1.2 介绍概述
Vue.js(简称为Vue)是一个用于创建用户界面的开源JavaScript框架,也是一个创建单页面应用的Web应用框架。所谓 单页Web应用(single page web application,SPA),就是只有一张Web页面的应用,是加载单个HTML 页面并在用户与应用程序交互时动态更新该页面的Web应用程序。
1.1.3 VUE的特点
遵循 MVVM 模式MVVM拆开来即为Model-View-ViewModel,有Model、View,ViewModel三部分组成。
Model层:模型层,主要负责业务数据相关,可以简单理解为data;
View层:视图层,顾名思义,负责视图相关,细分下来就是html+css层;
ViewModel层:Model与View沟通的桥梁,负责监听Model或者View的修改,是实现MVVM双向绑定的
也就是说MVVM模式采用双向绑定(data-binding):View的变动,自动反映在 ViewModel

编码简洁, 体积小, 运行效率高, 适合移动/PC 端开发
它本身只关注 UI, 可以轻松引入 vue 插件或其它第三库开发项目
1.2 使用vue开发工具调试
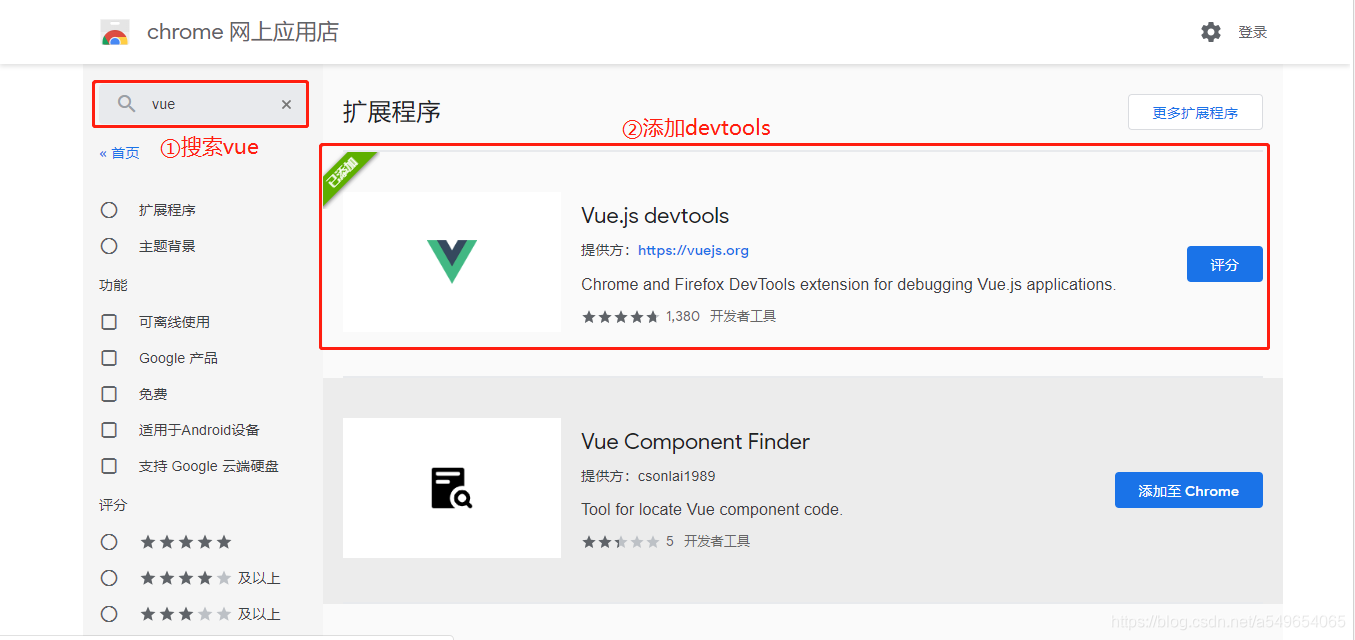
打开chrome,进入chrome网上应用店

添加完成后,以后使用chrome打开vue页面,F12调试里会多一个vue的调试选项

1.3 模板语法
1.3.1. 双大括号表达式
1) 语法: {{exp}}
2) 功能: 向页面输出数据
3) 可以调用对象的方法
1.3.2. 指令一: 强制数据绑定
1) 功能: 指定变化的属性值
2) 完整写法:
v-bind:xxx='yyy' //yyy 会作为表达式解析执行3) 简洁写法:
:xxx='yyy'1.3.3. 指令二: 绑定事件监听
1) 功能: 绑定指定事件名的回调函数
2) 完整写法:
v-on:keyup='xxx'

v-on:keyup='xxx(参数)'

v-on:keyup.enter='xxx'
3) 简洁写法:
@keyup='xxx'

@keyup.enter='xxx'
Example:
<!DOCTYPE html>
<html lang="en">
<head>
    <meta charset="UTF-8">
    <title>Test</title>
</head>
<body>
<div id="app">
    <h3>1. 双大括号显示</h3>
    <p>{{message}}</p>
    <br>

    <h3>2. 指令一: 强制数据绑定</h3>
    <a href="url">访问指定站点</a>
    <a v-bind:href="url">访问指定站点</a>
    <a :href="url">访问指定站点</a>
    <br>

    <h3>3. 指令二: 绑定事件监听</h3>
    <button v-on:click="test">点我</button>
    <button @click="test">点我</button>

</div>
</body>
<script src="https://cdn.jsdelivr.net/npm/vue/dist/vue.js"></script>
<script>
    new Vue({
        el: '#app',
        data:{
            message: 'helloworld',
            url: 'http://www.baidu.com'
        },
        methods:{
            test(){
                alert("HelloWorld");
            }
        }
    })
</script>
</html>
1.4 计算属性
1.4.1 计算属性
1) 在 computed 属性对象中定义计算属性的方法
2) 在页面中使用{{方法名}}来显示计算的结果
Example :
<!DOCTYPE html>
<html lang="en">
<head>
    <meta charset="UTF-8">
    <title>计算属性</title>
</head>
<body>
<div id="app">
姓:<input type="text" placeholder="First Name" v-model="firstName">
名:<input type="text" placeholder="Last Name" v-model="lastName">
姓名1:<input type="text" placeholder="Full Name1" v-model="fullName1">
</div>
</body>
<script src="https://cdn.jsdelivr.net/npm/vue/dist/vue.js"></script>
<script>
    new Vue({
        el:'#app',
        data:{
            firstName:'A',
            lastName:'B'
            // fullName1:firstName+ ' '+ lastName
        },
        computed:{
            //什么时候执行?初始化显示/相关的data属性数据发生改变
            fullName1(){
                console.log("fullName1()");
                return this.firstName+' ' + this.lastName;
            }
        }

    })
</script>
</html>
1.4.2 监视属性
1) 通过通过 vm 对象的$watch()或 watch 配置来监视指定的属性
2) 当属性变化时, 回调函数自动调用, 在函数内部进行计算
下面的示例实现了类似example 1-2的功能
Example :
<!DOCTYPE html>
<html lang="en">
<head>
    <meta charset="UTF-8">
    <title>监视</title>
</head>
<body>
<div id="app">
    姓:<input type="text" placeholder="First Name" v-model="firstName">
    名:<input type="text" placeholder="Last Name" v-model="lastName">
    姓名1:<input type="text" placeholder="Full Name1" v-model="fullName1">
</div>
</body>
<script src="https://cdn.jsdelivr.net/npm/vue/dist/vue.js"></script>
<script>
    const vm = new Vue({
        el:'#app',
        data:{
            firstName:'A',
            lastName:'B'
        },
        watch:{
            firstName:function (value) {
                this.fullName1 = value + " " + this.lastName;
            }
        }
    })

    vm.$watch('lastName',function (value) {
        this.fullName1 = this.firstName + " " + value;
    })
</script>
</html>
1.4.3 计算属性高级
1) 通过 getter/setter 实现对属性数据的显示和监视
JavaScript属性值有getter和setter两个回调函数.
getter:当获取当前属性值时自动调用, 将返回值(根据相关的其它属性数据)作为属性值
setter:当属性值发生了改变时自动调用, 监视当前属性值变化, 同步更新相关的其它属性值
2) 计算属性存在缓存, 多次读取只执行一次 getter 计算
下面的例子演示了双向绑定
Example:
<!DOCTYPE html>
<html lang="en">
<head>
    <meta charset="UTF-8">
    <title>双向绑定</title>
</head>
<body>
<div id="app">
    姓:<input type="text" placeholder="First Name" v-model="firstName">
    名:<input type="text" placeholder="Last Name" v-model="lastName">
    姓名1:<input type="text" placeholder="Full Name1" v-model="fullName1">
</div>
</body>
<script src="https://cdn.jsdelivr.net/npm/vue/dist/vue.js"></script>
<script>
    const vm = new Vue({
        el:'#app',
        data:{
            firstName:'A',
            lastName:'B'
        },
        computed:{
            fullName1:{
                get(){
                    return this.firstName + " " + this.lastName;
                },
                set(value){
                    const names = value.split(" ")
                    this.firstName = names[0]
                    this.lastName = names[1]
                }
            }
        }
    })
</script>
</html>
1.5 class 与 style绑定
1.5.1 理解
1) 在应用界面中, 某个(些)元素的样式是变化的
2) class/style 绑定就是专门用来实现动态样式效果的技术
1.5.2. class 绑定
1) :class=‘xxx’
2) 表达式是字符串: ‘classA’
3) 表达式是对象: {classA:isA, classB: isB}
4) 表达式是数组: [‘classA’, ‘classB’]
假设有这样的CSS样式
<style>
    .classA {
        color: red;
    }
    .classB {
        background: blue;
    }
    .classC {
        font-size: 20px;
    }
</style>
new Vue()函数如下:
<script>
    new Vue({
        el:"#app",
        data:{
            myclass:'classA',
            myclass1:'classB',
            myclass2:'classC',
            isB:true,
            isC:false
        }
    })
</script>
表达式是字符串: ‘classA’
<p :class="myclass">xxx是字符串</p>
//或者以下这种写法,但是不建议
<p :class="'classA'">xxx是字符串</p>
表达式是对象: {classA:isA, classB: isB} ,这里的对象是一个键值对,值只能是布尔型
<!-- 静态 -->
<p :class="{ classB:true, classC:false}">xxx是对象</p>
<!-- 动态 -->
<p :class="{ classB:isB, classC:isC}">xxx是对象</p>

<!-- 等价于 -->
<p class="classB">xxx是对象</p>
表达式是数组: [‘classA’, ‘classB’]
<!-- 绑定属性 -->
<p :class="[myclass1,myclass2]">xxx是数组</p>
<!-- 直接引用 -->
<p :class="['classB','classC']">xxx是数组</p>

<!-- 等价于 -->
<p class="classB classC">xxx是数组</p>
1.1.3. style 绑定
1)
<script>
    new Vue({
        el:"#app",
        data:{
            activeColor:'red',
            fontSize:25
        }
    })
</script>
style绑定:
<div id = "app">
    <p :style="{color:activeColor,fontSize:fontSize+'px'}">Style绑定</p>
</div>

//等价于
<p style="color: red; font-size: 25px;">Style绑定</p>
1.6 条件渲染
1.6.1 条件渲染指令
假设new Vue()函数如下
<script src="https://cdn.jsdelivr.net/npm/vue/dist/vue.js"></script>
<script>
    new Vue({
        el:"#app",
        data:{
            ok: false
        }
    })
</script>
1) v-if 与 v-else
语法类似我们常用的 if else语句,v-if 为真时,标签显示,否则显示 v-else 的标签
<div id="app">
    <p v-if="ok">这是if</p>
    <p v-else>这是else</p>
</div>
2) v-show
v-show的值为true时,标签才显示
<div id="app">
   <p v-show="ok">这是ok为 true </p>
   <p v-show="!ok">这是ok为 false </p>
</div>
1.6.2 比较v-if 与v-show
1) 如果需要频繁切换 v-show 较好
为什么?我们还是使用上面的new Vue()函数来看,代码如下:
<div id="app">
    <p v-if="ok">这是if</p>
    <p v-else>这是else</p>
    <p v-show="ok">这是ok为 true </p>
    <p v-show="!ok">这是ok为 false </p>
</div>
我们打开F12开发者工具,可以看到 v-if 和 v-else 指令会将标签移除,而创建一个对象需要时间,而 v-show 只是将标签隐藏,所以如果需要频繁的切换,v-show较号,当然如果标签较小的话,影响不大。

- 当条件不成立时, v-if 的所有子节点不会解析(项目中使用
1.6.3 列表渲染
new Vue()函数如下:
<script src="https://cdn.jsdelivr.net/npm/vue/dist/vue.js"></script>
<script>
    new Vue({
        el:"#app",
        data:{
            persons:[
                {name:'A', age: 15},
                {name:'B', age: 16},
                {name:'C', age: 17},
                {name:'D', age: 18},
            ]
        }
    })
</script>
1) 列表显示指令
数组: v-for / index
数组循环<ul id="app">
    <!-- 1个参数 -->
    <li v-for="(p) in persons">
        {{p.name}} === {{p.age}} === {{p}}
    </li>

    <!-- 2个参数 -->
    <!-- 使用第二个参数最好把 :key 加上-->
    <li v-for="(p,index) in persons" :key="index">
        {{index}} === {{p.name}} === {{p.age}} === {{p}}
    </li>
</ul>
添加数组 删除、更新、增加的方法
在 new Vue()函数里添加 methods属性methods:{
   deleteP(index){
      //调用了不是原生数组的splice(), 而是一个变异(重写)方法
      // 1. 调用原生的数组的对应方法
      // 2. 更新界面
      this.persons.splice(index,1)
   },
   updateP(index, newP){
      this.persons.splice(index,1,newP)
   },
   addP(newP){
      this.persons.push(newP)
   }
}新增按钮触发事件<ul id="app">
    <li v-for="(p,index) in persons" :key="index">
        {{index}} === {{p.name}} === {{p.age}} === {{p}}
        <button @click="deleteP(index)">删除</button>
        <button @click="updateP(index,{name:'CAT',age:1})">更新</button>
    </li>
    <button @click="addP({name:'DOG',age:2})">新增</button>
</ul>
对象: v-for / key
遍历对象,但是这种用法不常用<ul id="app">
    <li v-for="(item, key) in persons[1]" :key="key">{{key}}={{item}}</li>
  </ul>
2) 列表的高级处理
列表过滤
列表排序
Example :<!DOCTYPE html>
<html lang="en">
<head>
    <meta charset="UTF-8">
    <title>列表渲染_过滤与排序</title>
</head>
<body>
<ul id="app">
    <input type="text" v-model="searchName">
    <li v-for="(p,index) in filterPersons" :key="index">
        {{index}} === {{p.name}} === {{p.age}}
    </li>
    <div>
        <button @click="setOrderType(2)">年龄升序</button>
        <button @click="setOrderType(1)">年龄降序</button>
        <button @click="setOrderType(0)">原本顺序</button>
    </div>
</ul>
</body>
<script src="https://cdn.jsdelivr.net/npm/vue/dist/vue.js"></script>
<script>
    new Vue({
        el:"#app",
        data:{
            persons:[
                {name:'A', age: 15},
                {name:'B', age: 17},
                {name:'C', age: 16},
                {name:'D', age: 18},
            ],
            searchName: '',
            orderType:0 // 0代表不排序, 1代表降序, 2代表升序
        },
        computed:{
            filterPersons(){
                const {searchName, persons,orderType} = this
                let arr = [...persons]
                if (searchName.trim()){
                    //列表过滤,根据searchName查询符合条件的name
                    arr = persons.filter(p => p.name.indexOf(searchName) !== -1)
                }
                if (orderType){
                    arr.sort(function (p1,p2) {
                        if (orderType == 1){
                            return p2.age - p1.age
                        }else{
                            return p1.age - p2.age
                        }
                    })
                }
                return arr
            }
        },
        methods:{
            setOrderType(value){
                this.orderType = value
            }
        }
    })
</script>
</html>
1.7 事件处理
1.7.1 绑定监听
new Vue()函数如下:
<script>
    new Vue({
        el:"#app",
        methods:{
            test1(){
                alert("test1")
            },
            test2(msg){
                alert(msg)
            },
            test3(event){
                alert(event.target.innerHTML)
            },
            test4(msg, event){
                alert(msg + " === " +event.target.innerHTML)
            }
        }
    })
</script>
1) v-on:xxx="fun"
这种方法跟 2)里的方法无异
2) @xxx=“fun”
3) @xxx=“fun(参数)”
4) 默认事件形参: event
5) 隐含属性对象: $event<div id="app"><button @click="test1">test1</button>
<button @click="test2('abc')">test2</button>
<!--若事件不加参数,默认添加 $event -->
<button @click="test3">test3</button>
<!--若事件添加参数,则需手动添加参数-->
<button @click="test4('abcd', $event)">test4</button>
</div>1.8 表单输入绑定
1.8.1 使用v-model对表单数据自动收集
1) text/textarea
2) checkbox
3) radio
4) select直接上代码
Example<!DOCTYPE html>
<html lang="en">
<head>
  <meta charset="UTF-8">
  <title>表单输入绑定</title>
</head>
<body>
<!--
1. 使用v-model(双向数据绑定)自动收集数据
  text/textarea
  checkbox
  radio
  select
-->
<div id="demo">
  <form action="/xxx" @submit.prevent="handleSubmit">
    <span>用户名: </span>
    <input type="text" v-model="username"><br>

    <span>密码: </span>
    <input type="password" v-model="pwd"><br>

    <span>性别: </span>
    <input type="radio" id="female" value="女" v-model="sex">
    <label for="female">女</label>
    <input type="radio" id="male" value="男" v-model="sex">
    <label for="male">男</label><br>

    <span>爱好: </span>
    <input type="checkbox" id="basket" value="basket" v-model="likes">
    <label for="basket">篮球</label>
    <input type="checkbox" id="foot" value="foot" v-model="likes">
    <label for="foot">足球</label>
    <input type="checkbox" id="pingpang" value="pingpang" v-model="likes">
    <label for="pingpang">乒乓</label><br>

    <span>城市: </span>
    <select v-model="cityId">
      <option value="">未选择</option>
      <option :value="city.id" v-for="(city, index) in allCitys" :key="city.id">{{city.name}}</option>
    </select><br>
    <span>介绍: </span>
    <textarea rows="10" v-model="info"></textarea><br><br>

    <input type="submit" value="注册">
  </form>
</div>

<script type="text/javascript" src="https://cdn.jsdelivr.net/npm/vue/dist/vue.js"></script>
<script type="text/javascript">
  new Vue({
    el: '#demo',
    data: {
      username: '',
      pwd: '',
      sex: '男',
      likes: ['foot'],	// ['xxx']表示xxx被选中
      allCitys: [{id: 1, name: 'BJ'}, {id: 2, name: 'SS'}, {id: 3, name: 'SZ'}],
      cityId: '2',
      info: ''
    },
    methods: {
      handleSubmit () {
        console.log(this.username, this.pwd, this.sex, this.likes, this.cityId, this.info)
        alert('提交注册的ajax请求')
      }
    }
  })
</script>
</body>
</html>
1.9 生命周期
1.9.1 vue 生命周期分析
1) 初始化显示
* beforeCreate()
* created()
* beforeMount()
* mounted()
2) 更新状态: this.xxx = value
* beforeUpdate()
* updated()
3) 销毁 vue 实例: vm.$destory()
* beforeDestory()
* destoryed()
常用的生命周期方法有:
created()/mounted(): 发送 ajax 请求, 启动定时器等异步任务
beforeDestory(): 做收尾工作, 如: 清除定时器
示例如下:
new Vue()函数如下:<script type="text/javascript" src="https://cdn.jsdelivr.net/npm/vue/dist/vue.js">
<script type="text/javascript">
new Vue({
el: '#test',
data: {
isShow: true
},
mounted () {// 初始化显示后立即调用
// 执行异步任务
this.intervalId = setInterval(() => {
console.log('-----')
this.isShow = !this.isShow
}, 1000)
},
beforeDestroy() {
console.log('beforeDestroy()')
// 执行收尾的工作
clearInterval(this.intervalId)
},
methods: {
destroyVue () {
this.$destroy()
}
}
})
</script>编写一个按钮,使点击按钮之后调用方法进行 destroy Vue对象
<div id="test">
  <button @click="destroyVue">destory vue</button>
  <p v-if="isShow">HelloWorld</p>
</div>
1.10 动画
1.10.1 VUE 动画的理解
1) 操作 css 的 trasition 或 animation
2) vue 会给目标元素添加/移除特定的 class
3) 过渡的相关类名
xxx-enter-active: 指定显示的 transition
xxx-leave-active: 指定隐藏的 transition
xxx-enter/xxx-leave-to: 指定隐藏时的样式
示例如下:
new Vue()函数如下<script type="text/javascript" src="https://cdn.jsdelivr.net/npm/vue/dist/vue.js"></script>
<script type="text/javascript">
new Vue({
el:"#app",
data:{
isShow:true
}
})
</script>添加 style 样式:添加过渡样式类
<style>
        /*指定过渡样式*/
        .xxx-enter-active, .xxx-leave-active {
            transition: opacity 1s
        }
        /*指定隐藏时的样式*/
        .xxx-enter, .xxx-leave-to {
            opacity: 0;
        }
</style>具体html代码如下:<div id="app">
    <button @click="isShow=!isShow">Toggle</button>
    <!--transition包括的标签,会在显示之前、显示之后动态地添加一些类属性-->
    <transition name="xxx">
        <p v-show="isShow">This is Show</p>
    </transition>
</div>


帖子还没人回复快来抢沙发